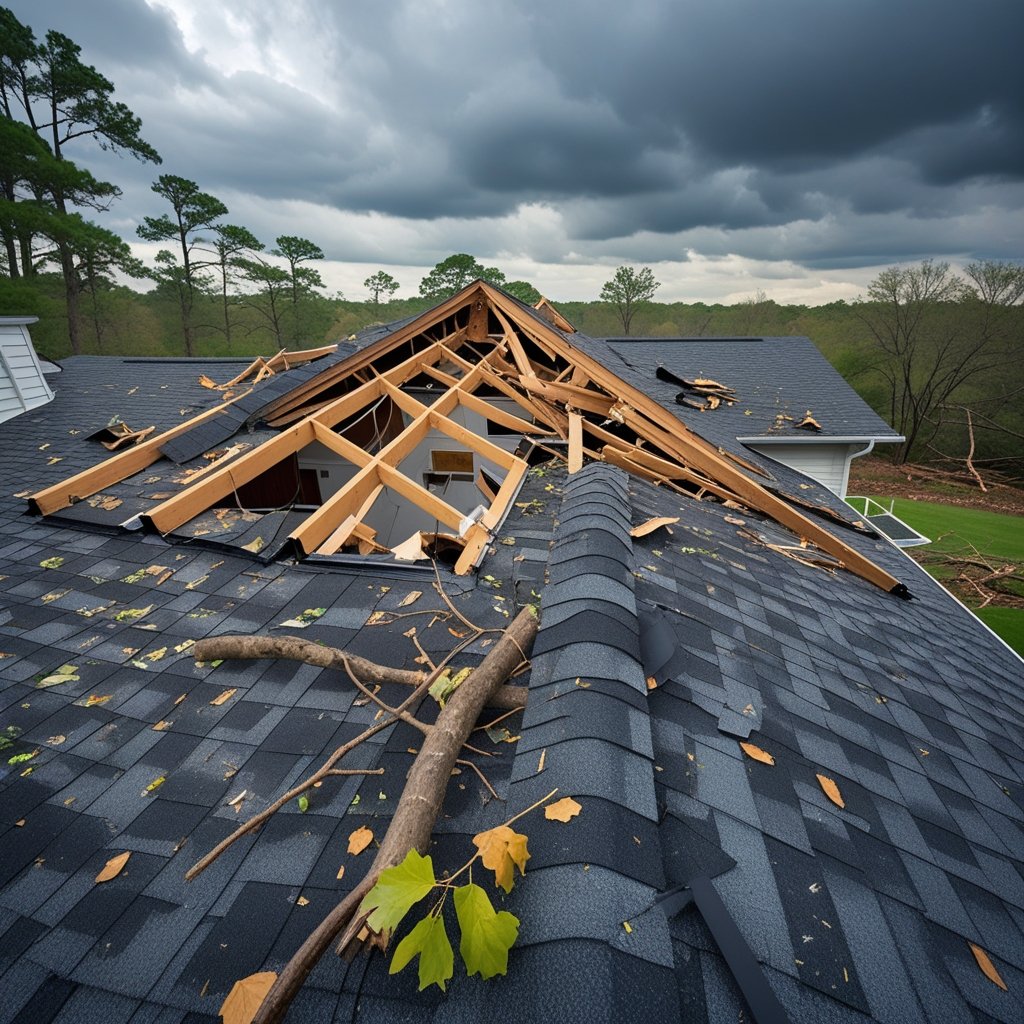
Dealing with roof damage after a storm can feel overwhelming. Knowing what to check can save you time and money.
A clear roof storm damage checklist helps you spot problems early. This lets you take quick action before small issues become expensive repairs.
This checklist guides you in looking for dents, missing shingles, and leaks caused by hail or wind.
You want to protect your home and make sure your insurance claim is strong. Reporting damage right away and having a professional inspection can help support your claim and avoid delays.
Using a checklist ensures you don’t miss anything important. It gives you confidence in handling the aftermath of a storm.
Assessing Immediate Roof Damage
After a storm, quickly check your roof for damage that could cause bigger problems later. Focus on any obvious leaks, missing shingles, or debris that might have fallen and could harm your roof or block drainage.
Checking for Visible Leaks or Water Intrusion
Start by looking inside your home for signs of leaks. Check the attic, ceilings, and walls for water stains, dampness, or mold.
These spots often show up as darkened areas or peeling paint. Outside, inspect the roof edges, vents, and any flashing.
If you see water dripping or wet spots, your roof may not be sealing properly. Address leaks early to prevent damage to the structure and your belongings.
Inspecting Roof Surface for Missing Shingles
Walk around your home or look from a safe spot to find any shingles that are cracked, curled, or missing. Missing shingles leave your roof exposed to rain and wind, which can cause leaks.
Pay close attention to the areas around chimneys, skylights, and valleys. These spots are more vulnerable to wind damage.
Looking for Fallen Debris or Tree Limbs
Storms often bring branches or other debris down onto roofs. Check for broken limbs, leaves, or loose hail that could harm shingles or block gutters.
Remove debris quickly to prevent extra pressure on your roof and allow water to drain properly. Large limbs might need professional removal to avoid further damage.
Documenting Storm Damage
After a storm, gather clear and detailed information about the damage. This helps you keep track of what needs repair and supports your insurance claim.
Taking good photos, writing down specific damage, and noting storm details will make the process easier and more accurate.
Photographing Affected Areas
Use a ladder safely to get close to your roof. Take clear photos of damaged shingles, cracks, or missing pieces.
Capture dents on metal parts like gutters, flashing, and vents. Photograph from different angles and include close-ups and wider shots.
Keep your photos organized by date and location on your property. These images are helpful when talking to contractors or insurance agents.
Creating a Written Damage Report
Write down all damages you find, including where they are and how severe they look. Use simple language like “broken shingle on east side” or “dent on metal gutter near the front.”
List each item separately and note any visible leaks or water stains inside your home. This written report will back up your photos and serve as a checklist for repairs.
Update your report if you find more damage later. This record will be useful when filing claims or scheduling work.
Recording Weather Details from the Storm
Note the date and time of the storm and the weather conditions you saw. Was there hail, heavy rain, wind, or ice?
Write down any unusual things you noticed, such as fallen branches or flooded areas near your home. Check local weather reports for details like hail size or wind speed.
This information can strengthen your insurance claim by showing what type of storm caused the damage. Keep this weather info with your photos and damage report for an organized file.
Inspecting Roof Components
When checking your roof after a storm, pay close attention to specific parts that can show signs of damage. Look carefully at the metal areas, drains, and vents to make sure they are still working properly and keeping water out.
Examining Flashing and Sealants
Flashing is the metal strip around chimneys, skylights, and vents that keeps water from leaking into your home. After a storm, check flashing for dents, cracks, or areas where it has come loose.
Sealants along the edges should be smooth and intact without gaps or peeling. If you see holes or damaged flashing, water can seep in and cause leaks inside your house.
Use a ladder safely to inspect these areas. If the sealant is cracked or missing, replace it to keep your roof watertight.
Assessing Gutters and Downspouts
Gutters and downspouts carry rainwater away from your roof and foundation. After a storm, look for dents, clogs, or breaks in these parts.
Gutters that are bent or detached can cause water to pool or overflow near your home’s base. Make sure downspouts are clear so water flows freely away from your house.
Check that gutters are firmly attached and not pulling away from the roof edge. Fixing any damage here helps prevent water damage to your walls and foundation.
Reviewing Roof Vents and Chimneys
Roof vents and chimneys help air flow and let smoke escape safely. Storms can cause dents, broken covers, or cracks.
Inspect vent caps to see if they are cracked or blocked by debris. Cracked vents let water and pests enter your attic.
Look at your chimney for loose bricks, damaged flashing, or cracks in the mortar. Damaged chimneys can lead to leaks or safety hazards.
If you find any damage, repair it quickly to protect your home’s structure and air quality.
Evaluating Structural Integrity
When a storm hits, damage may not just be on the surface. You need to look deeper to find soft spots, warping, or hidden moisture.
These signs affect how strong your roof is and if it needs repairs.
Checking Roof Deck for Soft Spots
Walk carefully on your roof deck and feel for any soft or spongy areas. These spots can mean the wood underneath is rotting or weakened by water.
Use a screwdriver to gently press down in suspicious areas. If the wood feels weak or breaks easily, that’s a sign of damage.
Soft spots can let water soak through, causing more damage inside your home. Fix these early to keep your roof strong and safe.
Looking for Sagging or Warping
Look along your roofline for any dips or uneven spots. Sagging can mean the support beams are damaged or the decking is warped.
Use a level or look at the roof’s shape from the ground or attic. Any part that looks droopy or out of place needs a closer look.
Sagging weakens the roof structure and might cause leaks or even collapse during heavy rain or wind.
Inspecting Attic for Hidden Moisture
Go into your attic and check for wet spots, mold, or a musty smell. Moisture here often comes from leaks in the roof deck or damaged flashing around vents and chimneys.
Shiny or discolored wood, water stains, or rusty nails show water has been getting through. Moisture in the attic can cause wood rot and lower your home’s energy efficiency.
Keep your attic dry to protect your roof’s structure and your home’s interior.
Identifying Signs of Hail and Wind Damage
When a storm hits, check your roof closely for damage that might not be obvious. Small dents and missing granules can weaken your roof and cause bigger problems if not found and fixed early.
Spotting Dents or Bruises on Roofing Material
Look for small dents, bruises, or cracks on your shingles or metal roofing. Hail can leave noticeable indentations, which might look like tiny craters or dings.
Check areas like vents, gutters, and downspouts too, because hail often hits those parts. Wind can also cause damage by loosening or lifting shingles.
If you see any shingles that seem cracked, bent, or missing, wind has caused wear. These damaged parts can allow water to get in and cause leaks later.
Checking for Granule Loss on Shingles
The surface of your shingles is covered with granules that protect the roof from sunlight and weather. After hail or strong winds, you may see bald spots where these granules are missing.
This looks like dark patches or areas where the shingle feels smooth or thin. You might also find granules in your gutters or downspouts.
Finding loose granules there means your roof has been hit hard. Granule loss can shorten your roof’s life and lead to leaks if left unchecked.
Reviewing Exterior and Interior Areas
When checking for storm damage, look beyond the roof itself. Damage can show up on the walls, siding, windows, and even inside your home.
Catching these signs early can help you avoid bigger problems later.
Inspecting Siding and Windows Near Roof
Check the siding close to your roof for cracks, dents, or holes. High winds or hail can cause damage that lets water in.
Look for chipped paint or warping too, as these are signs that moisture has affected the material. Windows near the roof are also vulnerable.
Make sure the glass is intact with no cracks or chips. Check the caulking around the frames to see if it’s cracked or missing, which can cause leaks.
Pay extra attention to edges where the roof meets siding or windows.
Looking for Ceiling Stains or Peeling Paint
Look inside your home for any stains or discoloration on ceilings and walls. Water stains often appear as yellow or brown spots and usually mean water is leaking from your roof.
Peeling or bubbling paint can also signal water damage. If you see these signs, check the attic or areas under the roof for any wet spots or mold.
These inside clues help you find damage you might miss when only looking outside.
Taking Safety Precautions During Inspection
Before checking your roof for storm damage, focus on safety. You need the right gear to protect yourself and avoid walking on weak parts of the roof.
Wearing Proper Protective Gear
Always wear sturdy shoes with good grip when you inspect your roof. Slippery or loose shingles can cause falls, so solid footwear helps prevent that.
Use gloves to protect your hands from sharp edges, nails, or broken shingles. Wear a hard hat, especially if you're near loose tree branches or if the roof looks unstable.
Bring safety goggles to keep dirt, dust, and debris out of your eyes. Dress in comfortable, weather-appropriate clothing that lets you move easily but also shields your skin from cuts.
Avoiding Unstable Roof Sections
Never step on areas that look damaged or sagging. These spots can collapse under your weight.
Look from the ground or use binoculars to spot trouble. Start your inspection on the edges or parts with solid support, like near chimneys or vents.
Avoid wet or icy surfaces because they are slippery. Use a sturdy ladder placed on solid ground to get on and off the roof safely.
If you feel unsure about walking on your roof, call a professional to do the inspection for you.
Planning for Temporary Repairs
After a storm damages your roof, act quickly to limit further harm. Cover broken spots and secure loose parts until a professional can fix everything properly.
Use the right materials and techniques to protect your home from leaks and wind damage.
Tarping Damaged Roof Areas
If your roof has holes or missing shingles, cover these areas with a tarp as the first step. Choose a heavy-duty tarp that is at least two feet larger than the damaged section on all sides.
This keeps rain and debris out of your home. Attach the tarp at the top edge of the damaged spot first.
Use roofing nails or staples to secure it under the existing shingles if you can. Avoid nailing directly into the wood sheathing to prevent more leaks.
Stretch the tarp tightly so water does not pool on it. Weigh down the edges with bricks or wood to keep it in place.
Check the tarp often after storms to make sure it stays secure until a professional repairs your roof.
Securing Loose Shingles or Tiles
Loose shingles or tiles can blow off in another storm and expose your roof further. Nail them back down or use roofing adhesive to hold them in place.
Be careful not to damage the shingles when nailing. Place roofing nails near the shingle’s edge, where the next overlapping shingle will cover them.
If shingles are cracked or broken, replace them as soon as possible. For tiles, apply roofing adhesive under the loose tile and gently press it into place.
Avoid walking on tiles, as they can break easily and cause more damage.
Contacting Insurance and Professional Help
After a storm, act quickly with your insurance and find the right roofing experts. This protects your claim and helps ensure quality repairs.
Knowing the steps to follow saves time and reduces stress.
Filing a Claim with Your Insurance Company
Report roof damage to your insurance company as soon as possible. Most policies require fast action, or you might lose your claim.
Take photos and notes to document the damage before calling your insurer. Be ready to give clear details about when and how the damage happened.
Ask if an adjuster will visit to inspect your roof. Keep all records, including inspection reports and communication, to support your claim.
A free professional inspection, such as one from Clear Choice Roofing, helps you prove the damage is real and linked to the storm.
Hiring a Licensed Roofing Contractor
Choose a licensed and experienced roofing contractor for repairs or replacement. A good contractor follows safety rules and uses quality materials.
They also understand local building codes and your area’s challenges. Look for companies with strong reputations and customer reviews.
Clear Choice Roofing, for example, is highly rated in Austin with over 1,400 reviews. They provide free estimates and help with insurance paperwork.
Make sure your contractor offers warranties on both work and materials. Always get a written estimate before work starts to avoid surprise costs.
Following Up After Initial Assessment
After you first check the roof and surrounding areas, document what you find. Take photos of dents, cracks, or missing shingles.
This helps you track damage and share it with professionals or your insurance company. Next, check your gutters and downspouts.
Look for dents or clogs caused by storm debris. Clearing these areas helps prevent water damage.
If you find serious issues or are unsure about the damage, contact a roofing expert. Professionals like Clear Choice Roofing can give you a full inspection and advice on repairs or replacements.
You might need help with insurance claims. Clear Choice Roofing offers support to understand adjuster paperwork and guide you through the process.
Schedule a professional checkup soon after your initial assessment to protect your home.
Frequently Asked Questions
Storm damage can hide in many ways, from missing shingles to cracks you might not see at first. Knowing what to check for and how to act helps protect your roof and home.
What steps should I take to inspect my roof after storm damage?
Start by safely checking your roof for missing or damaged shingles. Look for dents, cracks, or lifted roof covering.
Inspect gutters and downspouts for debris or damage. Take photos to document the condition before calling a professional for a full inspection.
How can I identify hail damage to my roof shingles?
Hail damage often appears as small dents or bruises on shingles. You might see missing granules, making the surface look rough or worn.
Check edges and flat areas closely. If you cannot see the damage or the roof is steep, hire a professional to inspect it.
What does a home inspector look for when assessing storm damage on a roof?
Inspectors check for torn, cracked, or missing shingles. They also look for leaks inside the attic or water stains on ceilings.
They note damaged flashing, vents, and gutters. These details help decide if repairs or replacement are needed.
When is a roof replacement necessary after a storm?
If large sections of shingles are gone or many are cracked and lifting, you might need a replacement. Severe hail damage that removes granules can shorten your roof’s life.
A roof older than 15-20 years with storm damage often needs replacing. A professional can help you choose the best option.
How do insurance adjusters evaluate roof damage claims?
Insurance adjusters look for torn shingles, dents, and missing parts. They compare your roof’s condition to its age and typical wear.
Report damage quickly after the storm. A professional inspection report supports your claim and makes the process smoother.
What immediate actions should I take if my roof is blown off during a hurricane?
First, keep everyone safe. Avoid entering damaged areas.
Cover exposed parts with tarps. This helps prevent water damage inside your home.
Contact your insurance company quickly to report the loss. Then, reach out to a trusted roofing contractor for emergency repairs and a full assessment.